
Doing some tasks faster and more accurate than humans do, doesn’t make Technology more Intelligent than Humans. Probably, the fact that Tesla and xAI invest billions in LLM and Computing (acquiring 300K of H100 NVIDIA GPUs) makes to do invasive marketing, and overall this is good for the tech industry.
In the context of uniqueness and complexity of Human Intelligence, I’d agree with Meta’s AI chief Yann LeCun who changed his mind saying AI will never reach human-level Intelligence…
https://arstechnica.com/information-technology/2024/04/elon-musk-ai-will-be-smarter-than-any-human-around-the-end-of-next-year/
Will AI reach Human-level Intelligence?
Posted by Abzetdin Adamov on April 11, 2024
Posted in Uncategorized | Leave a Comment »
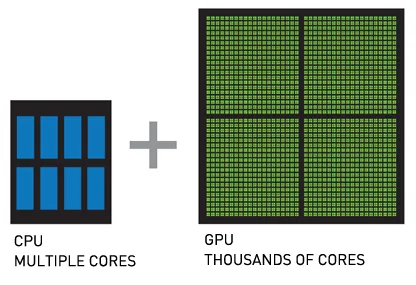
Diminishing difference between CPU and GPU
Posted by Abzetdin Adamov on March 30, 2024
Intel comes up with CPU-Z Granite Rapids with 80 cores and huge size of L3 cache 672MB. It become apparent that in this way chipmakers – NVIDIA’s rivals will try to fuzzy differences between CPU and GPU devices. Apple’s M3 processor comes with 16‐core CPU and embedded 40‐core GPU. It’s still far from about 20K cores in premium GPUs from NVIDIA, and surely not enough for large training, but 80 cores are quite enough to make it good in inference.
Posted in Uncategorized | Leave a Comment »
There are still good people who say “Where is the Science in Computer Science?”
Posted by Abzetdin Adamov on March 27, 2024
It really sounds like someone would say “Where is the Science in Computer Science?” (Oct. 2012)…
Through the decades of CS history, this field has been serving for almost all other fields, branches and areas of research bringing opportunities those can’t be even imagine otherwise. But it should be accepted that CS is not just about computers and calculations, same as astronomy is not about telescope. CS is about computing theory, information theory, instructions, hardware, software, …. Dedicated research and study in CS is vital to keep this field serving for all variety of other fields years to come.
Through the decades of CS history, this field has been serving for almost all other fields, branches and areas of research bringing opportunities those can’t be even imagine otherwise. But it should be accepted that CS is not just about computers and calculations, same as astronomy is not about telescope. CS is about computing theory, information theory, instructions, hardware, software, …. Dedicated research and study in CS is vital to keep this field serving for all variety of other fields years to come.
Posted in Uncategorized | Leave a Comment »
ChatGPT as a Coder or Will AI replace Programmers?
Posted by Abzetdin Adamov on January 3, 2023
“If an elderly but distinguished scientist says that something is possible, he is almost certainly right; but if he says that it is impossible, he is very probably wrong.”
A couple days ago during tea time with my students of the joint program ADA University and George Washington University (Computer Science and Data Analytics) one of my students answering the question “what is your top concern about the future?” said “I worry that AI will take my job as a programmer”. I responded saying that probably it’ll not take place earlier than several decades.
Today I decided to check capabilities of the new arrival to AI landscape ChatGPT. Along with ability to be engaged in realistic conversations, chatbot can also generate computer programming codes. Today I’ve submitted the following query to the ChatGPT chatbot launched by OpenAI in November 2022 and built on top of the new version of well known large language model GPT 3.5.
My query was “generate code for web crawler with multithreading support that implements polymorphism in java”
As a response the model generated 50 lines of code in just a couple of seconds. I can’t say the code is ideal and ready to run, but it’s ideal as a template if you consider the time it took to generate, also it can be improved with further interactions with the model. The output is really amazing: it implemented the method for crawling, it implemented concurrency and it wrote the code in a truly object-oriented manner. After changing the last word of the query to “Python”, it generated the same task in Python language.

As a response to my another query “generate data model for HR system using ORM in java”, ChatGPT came with data model consisting of three classes: “Employee”, “Department” and “Holiday” supporting it with quite detailed description of relationship types between table (one-to-many, many-to-one) and primary keys.
I continued my interaction with “Having just three classes for full HR system is too simple. Can you offer data model for real HR system for the large business entity?”. ChatGPT responded with a very kind reply “Certainly! Here is a more complete data model for an HR system for a large business entity, using Object-Relational Mapping (ORM) in Java:” and according to the model’s point of view, it’s enough for HR system of large business entity to extend data model with several fields in each class and add one new class “PerformanceReview”.

The query “Please, generate data model for HR system using ORM in Go” results with the same data model, but in Go programming language. That means that ChatGPT is familiar with the syntax of all popular programming languages. This also proves another important truth: one can doubt in the ability of model to generate code, assuming that it just brings codes from code repositories (like Github, SourceForge, Codebase, Bitbucket, StackOverflow, etc.), but the last query disproves that assumption. ChatGPT really generates code, learning from billions of code snippets and projects it has access to.
Of course, it’s far away from being mature enough to generate a real software product, or data model for the real system, but certainly, it’s in the right direction and will improve over time.

How it will affect education?
What does it mean for educators and students? Some students may think that they will be able to utilize ChatGPT and other AI systems to delegate them their programming assignments. But, in reality it is not as easy as it can sound. To make the model to produce exactly what is required, one will need to write very accurate and precise requirements that include enough details for the model to solve the task. As you know, good requirements and specifications are up to 70-80% of the success. If students are able to write those requirements, why not spend the remaining 20% of the effort to write the code by himself, instead of risking being caught for plagiarism. At the same time, students can continue using the AI system for the satisfaction of ego and how well they perform as a human in comparison with AI.
It also will bring some challenges to professors as well. Probably, those who want to prevent students from feeding their assignments directly to AI-powered systems, will need to spend more time making assignment descriptions be more abstract and at the same time clear enough for students to generate requirements and write resulting code. Certainly, in light of AI advancements and derived opportunities, the education community will be forced to revise existing policies.
Conclusion
As I can’t refer to myself as distinguished or neither elderly, so even after my experience with ChatGPT, I’m still of the same opinion: programmers are not at the risk of losing their jobs, at least for another several decades. It’ll take time before the AI will be able to compete with human programmers (not coders). AI can produce the solution for the small coding task and quality will improve over the time.
But when it comes to programming of large and complex enterprise systems with sophisticated business models/logic, AI-powered code generators would not be helpful. This kind software development project is about many components including: project management, business intelligence, business analysis, quality assurance, platform/cloud engineering (DevOps), database management (ORM), data warehousing, backend/frontend development, UI/UX, security, scalability, testing, deployment. All these components should be in harmony with each other and strongly integrated.
Does it mean that AI will never be able to deal with that complexity? Of course, it doesn’t. But it’ll take a long before AI acquires enough knowledge about business and about the overall World. AI will also be prone to mistakes, as humans do, but those mistakes can’t be easily found and explained by humans. Possibly, AI will find a way to do it differently bypassing some steps and making the lifecycle less sophisticated. We will see what way AI chooses, probably, in a couple of decades, or sooner.
Posted in Uncategorized | Tagged: AI, ChatGPT | Leave a Comment »
Happy Birthday TCP/IP
Posted by Abzetdin Adamov on January 1, 2022

Today is not just beginning of 2022, 1 January is the birthdays of one of most significant inventions in the history of humanity. January 1, 1983 TCP/IP protocol was born and put in use that for decades underpins the entire Internet. In early 1983 Vint Cerf (inventor of protocol) had no idea which platforms will communicate over TCP/IP and what kind of data to be transmitted over connected devices. Almost 4 decades passed since there, thousands new platforms and applications appear transferring hundreds data type/format using technology invented 4 decades ago… Happy birthday TCP/IP! Happy New Year All!
Posted in Uncategorized | Leave a Comment »
Will Quantum Computing replace Traditional Computing?
Posted by Abzetdin Adamov on April 22, 2020

Same as with many other pioneering technologies (like Big Data, Deep Learning, Blockchain, IoT), Quantum Computing become buzzword for IT-empowered community thanks to tech giants including Google, IBM, Intel, Microsoft and promising startups. They invest billions to R&D related with field to secure own piece of pie in case if Quantum Computing become available in widespread use. A lot of people are talking about the technology, but limited have real application experience and proof of concept.
Most probably, in coming decades, Quantum computing will not be same efficient as traditional computers for general computational tasks, but they will be more productive for specific mathematical problems that matches well with their philosophy. What is more realistic, Quantum Computing will never replace traditional computing, instead will work in concert with them empowering each other. The future of Quantum Computing is same unclear as the stability of its superpositions. It is still in its infancy, the support infrastructure is too expensive and unstable.
The World has drastically changed in 20th century thanks to computing revolution recursively changing demand for computation. But if we look to history of computation, the only things that changed since first computer invention, are power, capacity, scale and application, but not the way of computation itself. It is right time for scientific and business communities worldwide to look for new computation paradigm expanding horizons of invention that may bring up an alternative for the traditional one that was invented centuries before the first computer appeared. At the beginning, it is not required for the new concept or paradigm to be better, it is enough to be different…
Posted in Uncategorized | Leave a Comment »
Tech Companies: winners and losers of the lockdown
Posted by Abzetdin Adamov on April 12, 2020

The Internet is the most open and powerful platform that brings together those who want to buy something and sell something… The most successful Internet giants mostly do not produce any product or offer sophisticated services. They just provide user-friendly interface designed to collect Data in expense of providing narrow and simple, however largely demanded service. The main idea of the platform is to Analyze in-depth the voluntarily provided massive Data, learn more trying to see end-to-end picture of the client, catch his behavior and try to predict his next action (or even to manage his actions…). And at this point Deep Science (Big Data, Data Science and Analytics, Machine Learning, etc.) can help fine-tune the service to make it much better and appealing for wider audience.
- Airbnb – the world’s largest accommodation provider owns no single room;
- Netflix – the world’s largest movie house owns no cinemas;
Business Model is really important in tech industry. But, you never predict the market demand and how exceptional circumstances can affect this demand…
Two Internet giant companies with opposite concept in terms of “Stay at Home”: One of the most successful unicorn company AirBnb plunges down, while another one Netflix experience unseeing demand (badly affecting the speed of connectivity Worldwide)…
Posted in Uncategorized | Leave a Comment »
AICT2020 Coronavirus Statement
Posted by Abzetdin Adamov on April 12, 2020

On March 11, 2020, the World Health Organization declared COVID-19 a pandemic. The safety and well-being of all conference participants is our priority, therefore we are carefully considering our plans going forward.
We are following updates about the situation from the government of the Republic of Uzbekistan, which is working closely with the World Health Organisation (WHO) and will update our plans accordingly. We will follow to safety recommendation from IEEE.
We will provide additional information in timely manner. The AICT2020 continues to accept submissions and peer-revision will be in place according to timeline.
For the most current information about COVID-19, see the following resources:
Posted in Conferences - Events | Leave a Comment »
The IEEE AICT2020 – 2nd Scientific Pilgrimage to the birthplace of al-Khwarizmi
Posted by Abzetdin Adamov on February 21, 2020
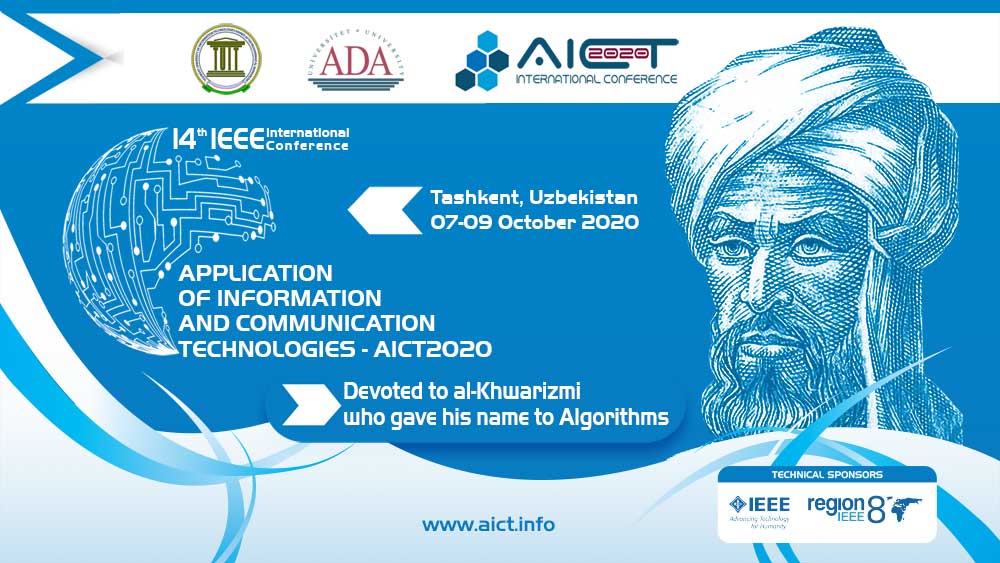
Algorithms shape our lives. They decide how much to pay for goods or services, what to watch next, which information/news to see online, who will be our next friend, what route to take to reach a destination, etc. But have you ever thought what was the origin of the word Algorithm? AICT2020 is devoted to the scientific heritage of the man who formalized algorithms – Abdullah Muhammad bin Musa al-Khwarizmi. In 1979, Profs. Andrey P. Ershov and Donald E. Knuth with colleagues organized a Scientific Pilgrimage to the birthplace of al-Khwarizmi, the famous mathematician from Khiva (Khwarezm region), to celebrate the 1,200 years of his birth. He gave his name to the words “Algorithm” and “Algebra” which have become pillars of modern Computer Science and now Data Science.
After 40 years, we plan to organize in the framework of the AICT2020 the 2nd Scientific Pilgrimage to the birthplace of al-Khwarizmi to celebrate the 1,200 years of al-Khwarizmii becoming the head of the House of Wisdom in Baghdad (scientific research and teaching center). Every computer scientist to whom the word “Algorithm” makes great sense is welcome to join us during this Scientific Pilgrimage that will be complemented with a Summer School and Workshop for local university students and conference participants in Khiva/Urgench on 05-06 October, 2020.
Building on the success of previous conferences, AICT2020 is expected to be one of the most significant international academic conferences on ICT applications, which brings together researchers, academics, practitioners around the world to exchange, reveal and promote the latest advances on application of ICT. You are welcome to join us.
Abzetdin Adamov, AICT2020 Genera Chair
Posted in Uncategorized | Leave a Comment »
Setting Up CDH Cloudera Distribution Hadoop Multi-Node Cluster. Step-by-Step Tutorial for Semi-Automated Installation.
Posted by Abzetdin Adamov on January 6, 2020
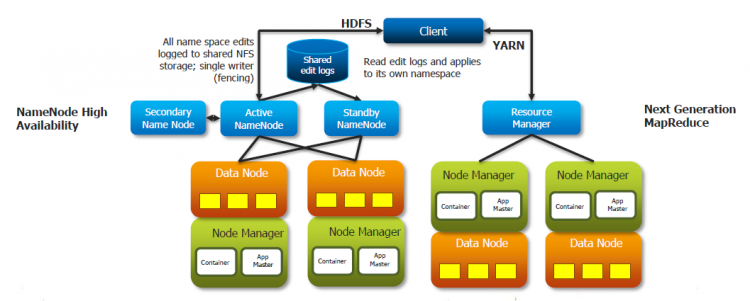
I. PREPARATION OF VIRTUAL ENVIRONMENT
This tutorial is about building small Hadoop Cluster (Cloudera CDH 6 – Cloudera Distribution Hadoop) on pre-built Virtualbox Virtual Machines (VM). 5 VMs will be used, one for NameNode (Master) and 4 others for DataNodes (Workers). The 6th VM will be used as a Repository where installation packages of different Components. Using local repository will help to make installation process mush faster. It is also only way in case if Workers don’t have Internet connection. Creation of 6 VMs, installation of OS and Network settings will require quite a lot of time and efforts. To make the process more effective, just one VM can be built and set and after that it can be Cloned 5 times to have necessary number of VMs.
While building clones make sure that all clones are Full Clones (not Linked Clone) and also chose setting Generate New MAC Addresses…
Virtual Machines:
- cluster-Node1 – 6GB/30GB VDI (dinamically allocated)
- cluster-Node2 – 5GB/30GB VDI (dinamically allocated)
- cluster-Node3 – 5GB/30GB VDI (dinamically allocated)
- cluster-Node4 – 5GB/30GB VDI (dinamically allocated)
- cluster-Node5 – 5GB/30GB VDI (dinamically allocated)
- cluster-Repo – 2GB/35GB VDI (dinamically allocated)
Each VM has two adapters: NAT for Internet Conenction and Host-Only for connectivity between all VMs and VMs with Host computer. For the convenience, static IP address was set for each Node.
Host computer is Windows 10 and all Guests are Centos 7.7.
All steps will be implemented using root user. Root user’s password is same for all Nodes for convenience. Install OS Centos 7.7.1908 x86 64 bit Minimal on each of VMs. Image for distribution is available at: Mirror server
II. PREPARATION OF PLATFORM
Hadoop Cluster may consist of from several to hundreds computers (nodes) those must be set in certain way and installed with special components and tools. This process may require a lot of time in order to implement all necessary steps sequentially on each node. In order to resolve this issue, in current tutorial multiple commands will run sequentially or parallely on remote Nodes performing non-interactive password-based authentication.
SSHPASS utility – enables passing the password to SSH for authentication and avoid being asked to enter password interactively. Bash loop can be used to implement SSHPASS sequentially for each Node. In case if password-less authentication is set, we can use simply SSH.
PSSH utility – enable execution of commands in parallel on a number of remote Nodes through SSH connection. Since in our case after certain point of installation, we use password-less authentication, we will not pass password (otherwise key “-A” is required).
1. Update OS and install necessary utilities.
Since Cloudera Manager will be installed on Node Node1 we start from this VM.
yum -y update && yum -y upgrade
following command to enable EPEL repo on CentOS/RHEL server:
yum install epel-release

yum install python-pip
yum install pssh
yum install sshpass
yum install wget
root password is written into file located in root’s home directory to allow SSHPASS to read password in non-interactive way from file:
echo "password" >> ./passw.txt
chmod 600 passw.txt
2. Configure Hostnames for all computers (Nodes) of Cluster
Edit /etc/hosts and add IP addresses and FQDNs of each Node
192.168.56.110 node1.cluster.vm node1
192.168.56.111 node2.cluster.vm node2
192.168.56.112 node3.cluster.vm node3
192.168.56.113 node4.cluster.vm node4
192.168.56.114 node5.cluster.vm node5
192.168.56.115 repo.cluster.vm repo
Additionally, file “/root/hostName” with all FQDN (Fully Qualified Domain Name) of Nodes is created
echo -e "node1.cluster.vm\nnode2.cluster.vm\nnode3.cluster.vm\nnode4.cluster.vm\nnode5.cluster.vm" >> hostNames
3. Set hostnames of all remote Nodes using shell script and SSHPASS utility
cat /root/hostNames | while read HOSTNAME
do
   sshpass -f /root/passw.txt ssh -T root@${HOSTNAME} << EOF
      echo "==========================${HOSTNAME}"
      hostnamectl set-hostname ${HOSTNAME}
      echo "HOSTNAME=${HOSTNAME}" >> /etc/sysconfig/network
   EOF
done
Make sure that commands uname -a and hostname return same domain name
4. To introduce all Nodes to each other
This is optional step purposed to avoid being asked to approve fingerprint when connect to remote node the first time:
mkdir ~/.ssh
chmod 700 ~/.ssh

cat /root/hostNames | while read HOSTNAME
do
   echo "==========================${HOSTNAME}"
   ssh-keyscan ${HOSTNAME} >> ~/.ssh/known_hosts
done
To make known_hosts work for all users
cp ~/.ssh/known_hosts /etc/ssh/ssh_known_hosts
Copy appropriate files to all Nodes
#!/bin/bash
cat /root/hostNames | while read HOSTNAME
do
   echo "==========================${HOSTNAME}"
   sshpass -f /root/passw.txt ssh -T root@${HOSTNAME} << EOF
      echo "==========================${HOSTNAME}"
      scp /etc/hosts/ root@${HOSTNAME}:/etc/hosts
      scp /etc/ssh/ssh_known_hosts root@${HOSTNAME}:/etc/ssh/ssh_known_hosts
   EOF
done
5. Set Password-less SSH authentication
In order to install Cloudera CDH using Cloudera Manager, we need to set password-less SSH access from master-node (node1) where Cloudera Manager server will be installed to all slave-nodes. To do so, we should generate RSA keys (private and public) using ssh-keygen utility with default settings for location pressing ENTER, leave empty password pressing ENTER two times.
ssh-keygen
or just use following command to do things in silent mode
ssh-keygen -f id_rsa -t rsa -N ""
Following bash code will copy public key generated for master-node to all remote nodes adding the key to the authorized_keys file on each node.
#!/bin/bash
cat /root/hostNames | while read HOSTNAME
do
   echo "==========================${HOSTNAME}"
   sshpass -f passw.txt ssh-copy-id root@${HOSTNAME}
done
6. Disable the Firewall
To desable firewall on all Nodes
cat /root/hostNames | while read HOSTNAME
do
   sshpass -f /root/passw.txt ssh -T root@${HOSTNAME} << EOF
      echo "==========================${HOSTNAME}"
      systemctl disable firewalld
      systemctl stop firewalld
   EOF
done
7. Setting SELinux mode
Security-Enhanced Linux (SELinux) should be changed to permissive To check current state of SELinux the command getenforce can be used.
NOTE: Because we set PasswordLess SSH authentication, now we can use simply SSH without need to use SSHPASS.
cat /root/hostNames | while read HOSTNAME
do
   ssh -T root@${HOSTNAME} << EOF
      echo "==========================${HOSTNAME}"
      sed -i 's/SELINUX=enforcing/SELINUX=permissive/g' /etc/selinux/config
      setenforce 0  #To enforce changes without rebooting
      getenforce
   EOF
done
8. Enable an NTP Service
To Install NTP server on each Node. This time we use PSSF utility to install packages in parallel.
pssh --hosts hostNames -t 1000 --user root -i "yum install -y ntp;"
To add/replace NTP servers in /etc/ntp.conf config file on each Node
cat /root/hostNames | while read HOSTNAME
do
   ssh -T root@${HOSTNAME} << EOF
      echo "==========================${HOSTNAME}"
      sed -i '/^server/d' /etc/ntp.conf	# To remove existing servers in config file
      echo -e "server 0.pool.ntp.org\nserver 1.pool.ntp.org\nserver 2.pool.ntp.org" >> /etc/ntp.conf
   EOF
done
To enable NTP service on each Node
pssh --hosts hostNames -t 1000 --user root -i "systemctl start ntpd; systemctl enable ntpd; hwclock --systohc;"
9. Change max number of open files
use following commands to check appropriate value in your system
ulimit -Sn
ulimit -Hn
To change values
pssh --hosts hostNames -t 1000 --user root -i "echo -e '* soft nofile 10000\n* hard nofile 10000\nroot soft nofile 10000\nroot hard nofile 10000\n' >> /etc/security/limits.conf"
10. Since some components in CDH 6 requires Python 2.7, make sure that all Nodes have it.
Use “python –version” to verify it or following command to check all nodes
pssh --hosts hostNames -t 1000 --user root -i "python --version;"
11. Install JDK
Cloudera recommends to install Oracle’s JDK or OpenJava version 8. Since, Oracle requires authorization for download, what can complicate the download process for many Nodes, we used another publicly available repository (repo.huaweicloud.com).
pssh --hosts hostNames -t 10000 --user root -i "curl -LO https://repo.huaweicloud.com/java/jdk/8u202-b08/jdk-8u202-linux-x64.rpm; rpm -Uvh jdk-8u202-linux-x64.rpm"
Java Home Directory in our case is /usr/java/jdk1.8.0_202-amd64/
III. INSTALLING CLOUDERA MANAGER AND CDH
1. Cloudera Manager Repository
Download the cloudera-manager.repo file for Centos 7 to the /etc/yum.repos.d/
wget https://archive.cloudera.com/cm6/6.3.1/redhat7/yum/cloudera-manager.repo -P /etc/yum.repos.d/
rpm --import https://archive.cloudera.com/cm6/6.3.1/redhat7/yum/RPM-GPG-KEY-cloudera
2. Configure Local Repository
It is recommended to build Local Repository especially in case of having number of Nodes more than 10 and if Nodes don’t have access to Internet. Local Repository will be set on dedicated Node (repo.cluster.vm) Installing Web server
yum install httpd

systemctl enable httpd

systemctl start httpd
To download the files for the latest Cloudera Manager 6.3 release
mkdir -p /var/www/html/cloudera-repos

wget --recursive --no-parent --no-host-directories https://archive.cloudera.com/cm6/6.3.1/redhat7/ -P /var/www/html/cloudera-repos
wget https://archive.cloudera.com/cm6/6.3.1/allkeys.asc -P /var/www/html/cloudera-repos/cm6/6.3.1/

chmod -R ugo+rX /var/www/html/cloudera-repos/cm6
To download the files for the latest CDH 6.3 (6.3.2) release
wget --recursive --no-parent --no-host-directories https://archive.cloudera.com/cdh6/6.3.2/redhat7/ -P /var/www/html/cloudera-repos
wget --recursive --no-parent --no-host-directories https://archive.cloudera.com/gplextras6/6.3.2/redhat7/ -P /var/www/html/cloudera-repos

chmod -R ugo+rX /var/www/html/cloudera-repos/cdh6
chmod -R ugo+rX /var/www/html/cloudera-repos/gplextras6
Apache Accumulo for CDH
wget --recursive --no-parent --no-host-directories https://archive.cloudera.com/accumulo-c5/redhat/ -P /var/www/html/cloudera-repos

chmod -R ugo+rX /var/www/html/cloudera-repos/accumulo-c5
Configuring Hosts to Use the Internal Repository
cat /root/hostNames | while read HOSTNAME
do
   ssh -T root@${HOSTNAME} << EOF
      echo "==========================${HOSTNAME}"
      rm -f /etc/yum.repos.d/cloudera-repo.repo
      echo -e "[cloudera-repo]\nname=cloudera-repo\nbaseurl=http://Repository.cluster.vm/cloudera-repos/cm6/6.3.1/redhat7/yum\nenabled=1\ngpgcheck=0\n" >> /etc/yum.repos.d/cloudera-repo.repo
   EOF
done
Now we can check the content of Local Repository through Web-browser on following address http://repo.cluster.vm
3. Configuring a Local Parcel Repository
Add or edit the line in section of HTTP server settings file (/etc/httpd/conf/httpd.conf) as following:
AddType application/x-gzip .gz .tgz .parcel
Restart HTTP server
systemctl restart httpd
wget --recursive --no-parent --no-host-directories https://archive.cloudera.com/cdh6/6.3.2/parcels/ -P /var/www/html/cloudera-repos
wget --recursive --no-parent --no-host-directories https://archive.cloudera.com/gplextras6/6.3.2/parcels/ -P /var/www/html/cloudera-repos

chmod -R ugo+rX /var/www/html/cloudera-repos/cdh6
chmod -R ugo+rX /var/www/html/cloudera-repos/gplextras6
Local Repository Address for parcels: http://repo.cluster.vm/cloudera-repos/cdh6/6.3.2/parcels/ Apache Accumulo parcel for CDH
wget --recursive --no-parent --no-host-directories https://archive.cloudera.com/accumulo-c5/parcels/1.7.2/ -P /var/www/html/cloudera-repos

chmod -R ugo+rX /var/www/html/cloudera-repos/accumulo-c5
4. Install Cloudera Manager Server
yum install cloudera-manager-daemons cloudera-manager-agent cloudera-manager-server
5. Install and Configure Database for Cloudera Components
Cloudera Manager, CDH and other Components intensively using Database to store and read data. There are several alternative Database Management Systems supported by Cloudera: MariaDB, MySQL, PostgreSQL and Oracle. In this tutorial MariaDB will be used. Install MariaDB
yum install mariadb-server
Configure MariaDB
systemctl stop mariadb
Update/replace /etc/my.cnf config file according to following
[mysqld]
datadir=/var/lib/mysql
socket=/var/lib/mysql/mysql.sock
transaction-isolation = READ-COMMITTED
# Disabling symbolic-links is recommended to prevent assorted security risks;
# to do so, uncomment this line:
symbolic-links = 0
# Settings user and group are ignored when systemd is used.
# If you need to run mysqld under a different user or group,
# customize your systemd unit file for mariadb according to the
# instructions in http://fedoraproject.org/wiki/Systemd

key_buffer = 16M
key_buffer_size = 32M
max_allowed_packet = 32M
thread_stack = 256K
thread_cache_size = 64
query_cache_limit = 8M
query_cache_size = 64M
query_cache_type = 1

max_connections = 550
#expire_logs_days = 10
#max_binlog_size = 100M

#log_bin should be on a disk with enough free space.
#Replace '/var/lib/mysql/mysql_binary_log' with an appropriate path for your
#system and chown the specified folder to the mysql user.
log_bin=/var/lib/mysql/mysql_binary_log

#In later versions of MariaDB, if you enable the binary log and do not set
#a server_id, MariaDB will not start. The server_id must be unique within
#the replicating group.
server_id=1

binlog_format = mixed

read_buffer_size = 2M
read_rnd_buffer_size = 16M
sort_buffer_size = 8M
join_buffer_size = 8M

# InnoDB settings
innodb_file_per_table = 1
innodb_flush_log_at_trx_commit  = 2
innodb_log_buffer_size = 64M
innodb_buffer_pool_size = 4G
innodb_thread_concurrency = 8
innodb_flush_method = O_DIRECT
innodb_log_file_size = 512M

[mysqld_safe]
log-error=/var/log/mariadb/mariadb.log
pid-file=/var/run/mariadb/mariadb.pid

#
# include all files from the config directory
#
!includedir /etc/my.cnf.d
Enable MariaDB as a service and start it
systemctl enable mariadb
systemctl start mariadb
Set the MariaDB root password and other settings as followings
/usr/bin/mysql_secure_installation

[...]
Enter current password for root (enter for none):
OK, successfully used password, moving on...
[...]
Set root password? [Y/n] Y
New password:
Re-enter new password:
[...]
Remove anonymous users? [Y/n] Y
[...]
Disallow root login remotely? [Y/n] N
[...]
Remove test database and access to it [Y/n] Y
[...]
Reload privilege tables now? [Y/n] Y
[...]
All done!  If you've completed all of the above steps, your MariaDB
installation should now be secure.
Thanks for using MariaDB!
Installing the JDBC Driver for MariaDB
wget https://dev.mysql.com/get/Downloads/Connector-J/mysql-connector-java-5.1.46.tar.gz
tar zxvf mysql-connector-java-5.1.46.tar.gz

mkdir -p /usr/share/java/
cd mysql-connector-java-5.1.46
cp mysql-connector-java-5.1.46-bin.jar /usr/share/java/mysql-connector-java.jar
6. Create Databases for Cloudera Components
Login to MariaDB on console
mysql -u root -p
Create following Databases for different Cloudera software conmonents. For simplicity all database users are assigned with same password
CREATE DATABASE scm DEFAULT CHARACTER SET utf8 DEFAULT COLLATE utf8_general_ci;
GRANT ALL ON scm.* TO 'scm'@'%' IDENTIFIED BY '*****';

CREATE DATABASE amon DEFAULT CHARACTER SET utf8 DEFAULT COLLATE utf8_general_ci;
GRANT ALL ON amon.* TO 'amon'@'%' IDENTIFIED BY '*****';

CREATE DATABASE rman DEFAULT CHARACTER SET utf8 DEFAULT COLLATE utf8_general_ci;
GRANT ALL ON rman.* TO 'rman'@'%' IDENTIFIED BY '*****';

CREATE DATABASE hue DEFAULT CHARACTER SET utf8 DEFAULT COLLATE utf8_general_ci;
GRANT ALL ON hue.* TO 'hue'@'%' IDENTIFIED BY '*****';

CREATE DATABASE metastore DEFAULT CHARACTER SET utf8 DEFAULT COLLATE utf8_general_ci;
GRANT ALL ON metastore.* TO 'hive'@'%' IDENTIFIED BY '*****';

CREATE DATABASE sentry DEFAULT CHARACTER SET utf8 DEFAULT COLLATE utf8_general_ci;
GRANT ALL ON sentry.* TO 'sentry'@'%' IDENTIFIED BY '*****';

CREATE DATABASE nav DEFAULT CHARACTER SET utf8 DEFAULT COLLATE utf8_general_ci;
GRANT ALL ON nav.* TO 'nav'@'%' IDENTIFIED BY '*****';

CREATE DATABASE navms DEFAULT CHARACTER SET utf8 DEFAULT COLLATE utf8_general_ci;
GRANT ALL ON navms.* TO 'navms'@'%' IDENTIFIED BY '*****';

CREATE DATABASE oozie DEFAULT CHARACTER SET utf8 DEFAULT COLLATE utf8_general_ci;
GRANT ALL ON oozie.* TO 'oozie'@'%' IDENTIFIED BY '*****';
7. Set up the Cloudera Manager Database
To set Database, we use scm_prepare_database.sh script with following parameters: databaseType, databaseName, databaseUser. Default DatabaseName and DatabaseUser for Cloudera Manager are scm and scm.
/opt/cloudera/cm/schema/scm_prepare_database.sh mysql scm scm
8. Install CDH and Other Software
Start Cloudera Manager Server
systemctl start cloudera-scm-server
To observe the startup process
tail -f /var/log/cloudera-scm-server/cloudera-scm-server.log
The string INFO WebServerImpl:com.cloudera.server.cmf.WebServerImpl: Started Jetty server is indicates that Cloudera Manager is started. Now we can start Cloudera Manager Admin Console on browser using following address and port http://node1.cluster.vm:7180
Log into Cloudera Manager Admin Console using default credentials:
Username: admin
Password: admin
9. Now we have DONE
Now you can follow to step-by-step instructions at UI of Cloudera Manager Admin Console in order to complete installation.
Posted in Big Data and Analytics | Leave a Comment »
